Craft foam is a versatile material that can be used for a wide range of projects, from home decor to costumes and props.
One of the most efficient and precise methods of cutting craft foam is using a Silhouette machine. In this article, we will show you how to cut craft foam using your Silhouette machine, step by step.
Materials and Tools
Before we begin, you will need the following materials and tools:
- Craft foam
- Silhouette machine
- Silhouette cutting mat
- Silhouette AutoBlade
- Computer with Silhouette Studio software installed
I prefer to use the AutoBlade rather than the kraft blade as I find it gives me better cuts and is easier to manage.
Step 1: Prepare the Craft Foam
The first step is to prepare the craft foam for cutting. If the foam is larger than your cutting mat, you will need to trim it down to size. It’s important to have a clean and straight edge, as this will help ensure that your cuts are precise.
Step 2: Load the Craft Foam onto the Cutting Mat
Once the craft foam is trimmed to size, it’s time to load it onto the cutting mat. Make sure the sticky side of the mat is facing up, and place the foam on top, making sure it is centered. Then, use a ruler or straight edge to smooth out any bubbles or wrinkles in the foam, so it is firmly attached to the mat.
Step 3: Set the Blade Settings
Next, you need to set the blade settings on your Silhouette machine. This will depend on the thickness of the craft foam you are using. It’s best to start with the default settings and make adjustments as needed. You can find the recommended blade settings for different materials in the Silhouette Studio software.
However, if you want to follow my settings, here are my custom blade settings for cutting craft foam with my cameo 4.
- Blade Depth: 10
- Passes: 2
- Force: 20
- Speed: 3
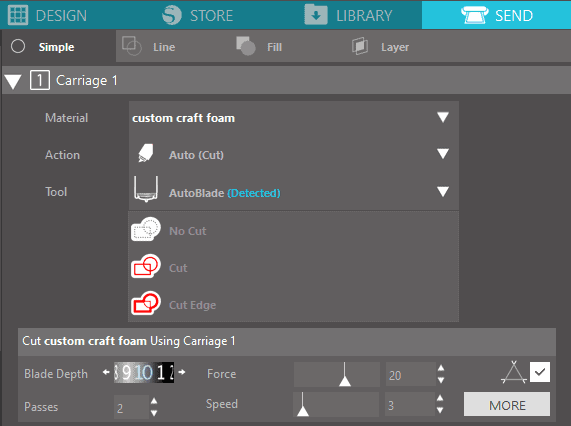
I’ve been cutting craft foam for a few years now and have found these to be my optimal settings.
Step 4: Design Your Cut
Now that the foam is loaded onto the cutting mat and the blade settings are set, it’s time to design your cut. Open the Silhouette Studio software on your computer and create your design. You can use the software’s design tools to create shapes, letters, or any other design you want to cut out of the craft foam.
Personally, I use creative fabrica to find my designs. It’s a super cheap service that offers thousands of unique designs, and the best part is they let you sell the designs commercially.
Step 5: Send the Design to the Silhouette Machine
Once you are satisfied with your design, it’s time to send it to the Silhouette machine. Click the “send to Silhouette” button in the software, and select your machine from the list. The Silhouette machine will then read the design and start cutting the craft foam.
Step 6: Remove the Cut Pieces
Once the cutting is complete, carefully remove the cut pieces from the cutting mat. The pieces should come off easily, but if any are stuck, use a craft knife to gently separate them.
Final thoughts
By following these simple steps, you can cut craft foam with precision and ease using your Silhouette machine. Whether you are making home decor, costumes, or props, the Silhouette machine is a great tool to help you get the job done. Happy crafting!
I’ve been an Etsy seller and Artisanal creator for over 8 years now and have gained so much valuable experience along the way that I would like to share with you. Read more about me here